
So, you’re an iOS developer. You practice the single responsibility principle religiously. You have a keen eye for extracting common code into reusable pieces. You want to build a library for reuse in other projects. What’s the best way to do this with Xcode?
That was one of my quests at the WWDC labs. Technically, there’s no official way that you must do this. The engineers I talked to said they made Xcode flexible to support a variety of situations. But in the interest of consistency and the high value I place on my opinion, I’ve adopted one: Sibling projects with static libraries in an Xcode workspace managed by git submodules.
Now, I’ll talk about git submodules in the future, soon. This post is already going to be pretty long. Let’s first focus on setting up Xcode to handle this. For our example, I will create a project that depends on my fork of the TouchJSON library.
Create a new directory somewhere named JSONTestWorkspace.
mkdir JSONTestWorkspace
In Xcode, create a new, empty workspace file with the same name and save it inside there.
Now, clone1 the TouchJSON repo into the workspace directory.
cd JSONTestWorkspace
git clone git://github.com/navellabs/TouchJSON.git
the awesomeness packed into git submodules.
Your workspace directory structure should now look like this:
JSONTestWorkspace/
    |- TouchJSON/
    \- JSONTestWorkspace.xcworkspace
Now, right click on the empty Xcode sidebar and choose “Add Files to
JSONTestWorkspace”.
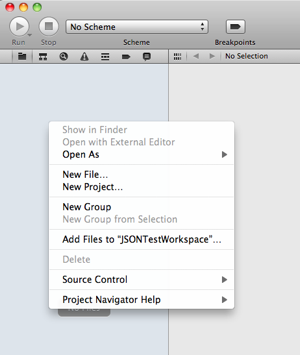
Browse to TouchJSON/Support and choose the Xcode project named
TouchJSON-iOS.xcodeproj. The project should now be in the sidebar of the
workspace.
In the “File” menu, choose “New” and then “New Project…”. Name it
JSONTestApp and make sure to check the “Include Unit Tests” option.
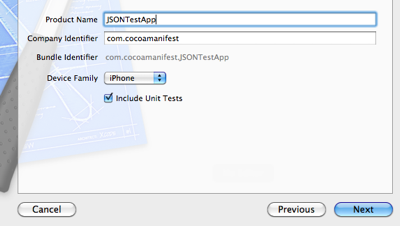
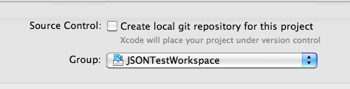
When prompted, save it in the main workspace directory where TouchJSON and the workspace file reside. Make sure it doesn’t create a new git repo, and make sure its “Group” setting is the workspace your already created.
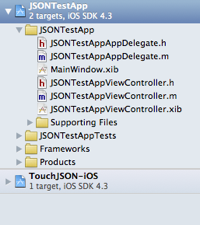
Your project tree in the sidebar should now look like this with the
JSONTestApp and TouchJSON projects as siblings in the workspace.
When you create or import projects into a workspace, Xcode automatically adds
schemes for each project. For our purposes, we don’t really want any
schemes other than for our main app project, so choose “Manage Schemes…” at
the bottom of the “Project” menu and delete the TouchJSON scheme that you see
as in the sheet below.

To make sure everything is working as expected, pick JSONTestApp and one of
the iPhone or iPad simulators in the scheme picker and choose “Test” from the
“Product menu to attempt a build. You should see the following error:

That means that the test suite works. We’ll use this test file to make sure we
wire up the TouchJSON library correctly in the workspace. In the
JSONTestAppTests/JSONTestAppTests.m file, replace all the contents with the
following:
#import "JSONTestAppTests.h"
#import "CJSONSerializer.h"

@implementation JSONTestAppTests

- (void)testDictionaryToJSON
{
    NSDictionary *dict = nil;
    NSData *jsonData = nil;
    NSString *jsonString = nil, *expectedJSON = nil;

    dict = [NSDictionary dictionaryWithObject:@"object" forKey:@"key"];
    jsonData = [[CJSONSerializer serializer] serializeDictionary:dict
                                                           error:nil];
    jsonString = [[NSString alloc] initWithData:jsonData
                                       encoding:NSUTF8StringEncoding];

    expectedJSON = @"{\"key\":\"object\"}";

    STAssertEqualObjects(expectedJSON, jsonString,
                         @"The JSON strings didn't match!");
}

@end
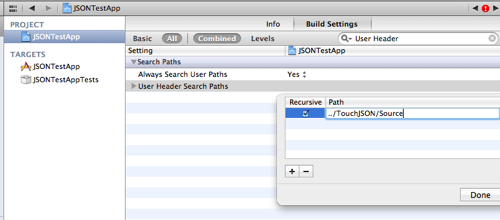
Back in the file browser of the Xcode sidebar, choose the JSONTestApp
project. Then choose the “JSONTestApp” project in the inner sidebar as shown
below. Choose choose the “Build Settings” tab and search for “User Header” to
filter down the list of settings. Double click on the empty value to add the
recursive path ../TouchJSON/Source.
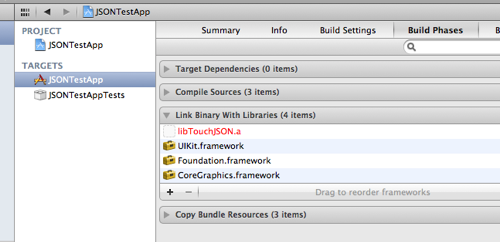
Now for each target in that inner sidebar (both JSONTestApp and
JSONTestAppTests) add the TouchJSON libary to be linked. Make sure the “Build
Phases” tab is selected and add the libTouchJSON.a as shown below. Click the
“+” to add it. (Again, make sure you do it to both targets!)
Finally! Choose “Test” from the “Product” menu (or just press Cmd-u). A
simulator with a black screen will pop up while the tests are run and no error
will be reported. If you view the run logs, you should see something like the
following:
Test Suite 'JSONTestAppTests' started at 2011-06-28 03:05:28 +0000
Test Case '-[JSONTestAppTests testDictionaryToJSON]' started.
Test Case '-[JSONTestAppTests testDictionaryToJSON]' passed (0.000 seconds).
Test Suite 'JSONTestAppTests' finished at 2011-06-28 03:05:28 +0000.
Executed 1 test, with 0 failures (0 unexpected) in 0.000 (0.000) seconds
To make sure you have everything wired up, let’s alter the test to purposely
make it fail. If you change the expectedJSON string variable to something
like @"walrus" and rerun the tests, you’ll see the error “The JSON strings
didn’t match!”
This walkthrough gives you some hands on experience adding sibling projects to a workspace, making sure the headers are found in the right place, and the targets are linked to the libraries. You can extract code into your own independent libraries like the way TouchJSON is set up and then link them in to your projects. In a bit, I’ll write up a post on using this technique with git submodules to help manage library versions and share the code with other app projects.
I’m using clone for now for simplicity for those that don’t know↩
My books...