
Looking for more information about UI Automation? Check out my new book, published through the Pragmatic Programmers. Thanks for your support!
Update: I gave a presentation on how UI AutoMonkey works at the CocoaHeads RTP in November 2012. I recorded the screencast if you want to see it in action.
UI AutoMonkey started out as a joke. While demonstrating Apple’s UI Automation tool in a presentation, I used a silly kids game that a friend and I were writing to show how you can just throw touch events anywhere at the screen. After quite a bit of feedback, I realized I was on to something.
It reminded me of Netflix’s Chaos Monkey, a service they wrote that pounds their production servers, shuts them down, interrupts communication, and tries it’s best to bring the network down. This gives the ops team real time feedback on the resiliency and health of their network. It’s bold and brave. And it’s a useful concept for our native iOS apps, too.
That’s where UI AutoMonkey comes in. It will tap, swipe, rotate, lock, unlock, and shake the simulator as fast as you want with all the random glory of a flip-flopping politician.
The monkey gives you two things, first a great way to chaos test your application without having to install anything or alter your Xcode project. Everything you need is bundled with Apple’s tools. Secondly, it’s a gentle introduction to UI Automation. This isn’t a replacement for a well crafted test suite or a QA department. You need human ingenuity to plan to break things. But the monkey is great way to find random memory leaks, race conditions or other bugs that you might not have thought to look for. I’ve already solved some autorotation and memory leak issues in my apps.
Setting up the monkey is pretty straightforward. You launch Instruments to profile it from Xcode and choose the UI Automation template. Paste in the monkey and run the script. The README has screenshots and step by step instructions if you’ve never messed with Instruments before.
The monkey begins with a configuration dictionary specifying how often the event types should occur. It looks something like this:
config: {
  numberOfEvents: 1000,
  delayBetweenEvents: 0.05,    // In seconds

  eventWeights: {
    tap: 50,
    drag: 1
  },

  touchProbability: {
    multipleTaps: 0.05,
    multipleTouches: 0.05,
    longPress: 0.05
  }
},
After telling it the number of events and how long to pause between, you set
the probabilities as relative weights. In this example, a “tap” event is fifty
times more likely than a “drag” event. The touchProbability is a deeper
customization of tap event method that let you specify a probability (from 0 to
1) that a touch is multiple taps, with multiple fingers, or a long press.
That’s pretty much it. Your app will get pummelled with events in the simulator, or the device if you launched it there. It’s fun to watch and can help you discover problems you didn’t know existed.
In fact, that’s just what happened to me.
We’ve got the full power of instruments at our fingertips. If you’ve not messed with the app before, check out the latest WWDC videos, particularly session 409, to get an official introduction.
The Allocations instrument lets us watch every Objective-C object ever created in the lifetime of the application. Drag that in to your Instruments document from the instruments library. The best part about the monkey is you can just run it and let it go. Everything that happens to the app is recorded in the trace log for you to go back through and inspect later.
I used this mechanism myself to find a wierd memory leak in my app,
ReadMore. I was using a custom keyboard that I built pre-iOS 4 so I
wasn’t using the inputView mechanism to add it to the screen. I hadn’t gotten
around to changing it since I went iOS 5.1 only, but when I realized that it
was leaking, I bumped the priority up.
It turns out that letting the monkey run for a good 10 minutes and then searching through the trace log revealed quite a few copies of my keyboard lingering around in memory. I wouldn’t have even noticed this had the monkey not happened to trigger the keyboard over and over again across several screens. When you’ve got 30+ copies of keyboards lingering around in memory, you know you’ve got problems.
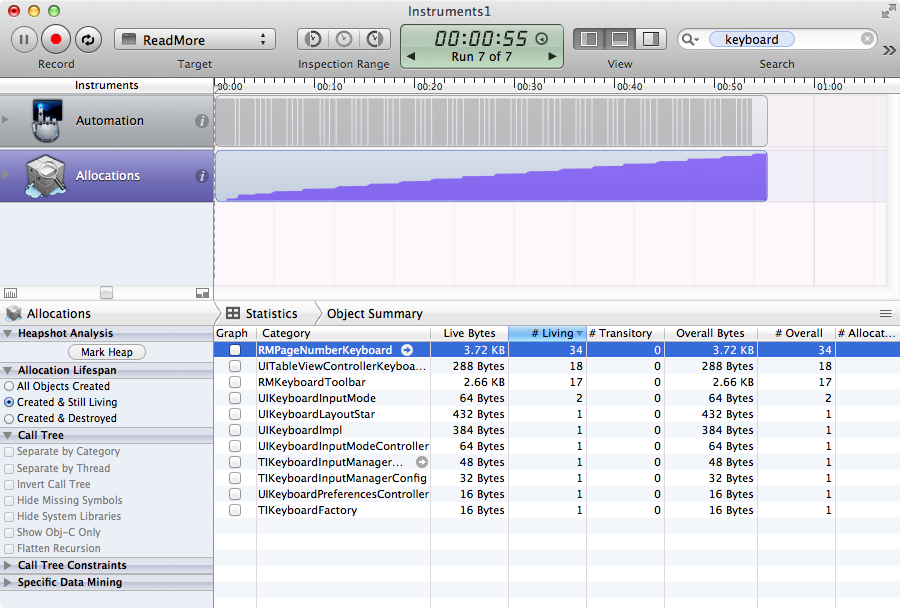
After discovering this, I did more targeted profiling and tracked down the problem. The monkey showed me the door. I merely had to walk through it.
The monkey comes ready with seven events to trigger randomly against your application, but you’re not limited to them. If, say, you have a certain kind of gesture or a combination of gestures that you want to trigger every once in a while, you can build a new event method and set how often you want it to occur.
For the sake of tutorial, let’s say you need an event that does a full diagonal
swipe across the screen and prints “MONKEY” to the trace log. No problem. Start
by naming the event and adding it to the eventWeights dictionary at the top
of the config:
eventWeights: {
  tap: 50,
  drag: 1,
  fullScreenDiagonalSwipe: 10
},
In this example, the diagonal swipe is 10 times more likely to happen than the drag, and 1/5 as likely to happen as the tap. Now, we need to go to the “Event Methods” section of the script and add this new method:
fullScreenDiagonalSwipeEvent: function() {
  this.target().dragFromToForDuration(
    { x: 0, y: 0 },
    { x: this.screenWidth(), y: this.screenHeight() },
    0.5
  );
  UIALogger.logMessage("MONKEY");
},
Note the comma at the end of the function declaration. That’s important because
these functions are defined as values of keys on the UIAutoMonkey object.
Any key you add to the eventWeights dictionary needs to have correspondingly
named event method defined on the monkey. In this case, the
“fullScreenDiagonalSwipe” will tell the monkey to call the
fullScreenDiagonalSwipeEvent() method. It just tacks “Event” on to the end of
the event name to do the lookup.
In that method, we have all the methods on UIAutoMonkey available to us.
Calling this.target() returns a fresh copy of the local target, and we can
tell to trigger a drag event between two points. To generate the diagonal swipe
coordinates, we can use this.screenWidth() and this.screenHeight() to
calculate where the drag should end up. The last parameter of 0.5 is the
duration of the drag. Look up UIATarget in the Xcode documentation for more
info.
After we trigger the drag, we print “MONKEY” to the trace log. And that’s it! We’ve just defined a custom event. When we run the monkey now, it will tap most of the time, diagonal swipe some of the time, and randomly drag somewhere on the screen every once in a while.
I hope this helps you find those crazy bugs, race condions, and memory leaks in your application. Contact me if you have any questions or suggestions for improvement. The monkey is here to serve.
For more information about my UI Automation resources, check out my features page.
✦ PermalinkMy books...