
Looking for more information about UI Automation? Check out my new book, published through the Pragmatic Programmers. Thanks for your support!
This is part of a larger study about UI Automation. For a good collection of the resources I’ve worked on, check out the features page.
UI Automation is Apple’s official UI driving framework. Despite some unfortunate quirks, it’s very powerful and is part of Instruments’ performance and debugging tools. You can use UI Automation to test interaction and results, and you can do analysis by executing the same tasks over and over again while watching the system behavior with other instruments.
Javascript is UI Automation’s written language. Personally, I think this is great since it’s powerful and flexible. But it can be daunting to the newcomers1 and it’s flexibility can take you down a path of unmanageable test suites without good forethought.
I want to have a three or four part series to unpack this tool and discuss some good patterns to follow. Good test suites should grow maintainably!
No post on cocoamanifest.net would be complete without a good rant. UI Automation itself is not automatable. You can only invoke it through the Instruments gui app. That means that you cannot use this as part of a CI build process or do scripted performance testing over different revisions. Very unfortunate. Hopefully Apple adds this in the future.
Update: Command line execution is now possible since iOS 5! Read up on the details here.
And secondly, the log output is horrendous. As you’ll see below, everything is output in a log pane within instruments. You’ll have to do a bit of hunting to see error messages. If this could all be piped “unix style” then it would be much more powerful, but alas, we are at Apple’s mercy yet again.
Would you pause with me to offer a prayer to the Apple engineers in hopes that they will honor our petition.
To keep us in sync, we’ll use the CoreDataBooks sample project that Apple
provides. Download it here and extract it. Make a directory inside
it named ui_testing. That’s where we’ll put our experimentation.
In your ui_testing folder, create a file named wip.js. I use the “wip” as
an abbreviation for “work-in-progress”. I keep wip.js as a playground of
sorts where I try out new ideas before I organize them in the rest of my test
files.
We’re almost ready to control iOS with UI Automation. Load up the
CoreDataBooks project in Xcode 4 and run Instruments by choosing “Profile”
from the “Product” menu (or press cmd-i). You can run Instruments manually,
of course, but this method automatically builds the app, installs in the
simulator and starts Instruments for you attached to the app. That way you can
make sure you always have the latest version running.
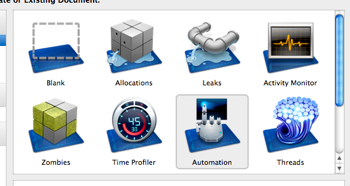
When Instruments loads up, you’ll see a dialog to choose a template. Pick “Automation” in the second row of icons and click the “Profile” button to create a new document from that template.
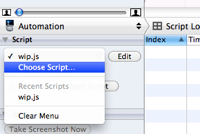
Once your Instruments document opens you’ll see the simulator launch with the
sample app. On the left side, open the dropdown menu and pick “Choose script…”
to find your wip.js file.
Now, click the “Start Script” button. You should see the “Script completed.” log message in the script log pane. Now we’re ready to play!

Let’s tap the “Edit” button in the book list. Put this line in your wip.js
file and run the script.
UIATarget.localTarget().frontMostApp().mainWindow().navigationBar().buttons()['Edit'].tap();
The table view in the CoreDataBooks app should now be in the editing state
with the delete buttons visible on the rows. Phew, that’s a mouthful to type.
Let’s breakdown what’s happening in that line.
// Local target is the running simulator
var target = UIATarget.localTarget();

// Get the frontmost app running in the target
var app = target.frontMostApp();

// Grab the main window of the application
var window = app.mainWindow();
window is an object of type UIAWindow which is a subclass of UIAElement.
Go ahead and search for those class names in the Xcode documentation. You’ll
see a lot of nifty methods to find your way around the views. For our example,
we want the navigation bar.
var navBar = window.navigationBar();
navBar is also a subclass of UIAElement. You’ll notice from the
documentation of that class that you can fetch a UIAElementArray of all
subviews by invoking elements().
var allElements = navBar.elements();
But in our case, we really only want to look for buttons, so we can use this instead:
var navBarButtons = navBar.buttons();
Once you have a UIAElementArray you can do all sorts of nifty tricks to get
to the element you want.
// Find the first element
var firstButton = navBarButtons[0];

// Find all the elements with a given name
var editButtons = navBarButtons.withName('Edit');

// Find all the elements by a predicate
var editButtons = navBarButtons.withPredicate('name == "Edit"');

// Shortcut to find first button with a given name
var editButton = navBarButtons['Edit'];
Now that we have the edit button as an object, let’s tap it.
editButton.tap();
Magic happens and the table goes into edit mode. How do we get out of edit mode? We tap the “Done” button!
navBarButtons['Done'].tap();
Lets put this together in a complete script that taps the edit button and then
taps the done button. Replace the contents of wip.js with the following code
and make sure the app is not editing the table view.
var target = UIATarget.localTarget();
var app = target.frontMostApp();
var window = app.mainWindow();
var navBar = window.navigationBar();
var navBarButtons = navBar.buttons();

navBarButtons['Edit'].tap();

// Pause for two seconds
target.delay(2);

navBarButtons['Done'].tap();
Run this script and you should see the table go into edit mode, wait for 2 seconds, and then leave edit mode.
Notice the delay() method on the target. I paused for 2 seconds for two
reasons. First, I wanted to make sure we saw the transition in and out of edit
mode, but also because the simulator needs time to animate. If we didn’t pause,
then the “Done” button may not be tapped. Think about it from a user’s
perspective. Just as the user needs to pause to wait for the user interface to
settle after animations, so should your automation code. Look up the docs on
UIATarget for more info and other useful methods to control the simulator.
Now that we know how to tap the “Edit” button, what if there is some other element on the screen we need to tap? How do we find it in the view heirarchy?
logElementTree() is your friend. Any UIAElement can be queried to see what
elements it contains. When invoked, logElementTree() will print out the
subviews to the log pane in a marginally useful form. Let’s do that to the nav
bar.
navBar.logElementTree();

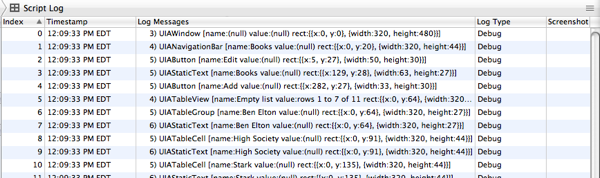
Unfortunately, this is one of the weakest points of UI Automation. The log output is flat and wrapped up in a cumbersome UI. But lets forge ahead and interpret this.
The numbers “4)” and “5)” indicate the depth this particular subview is
nested from the root. You see the UIANavigationBar is at level four, and has
three subviews; one of which is a UIAButton with the name “Edit”. This is the
best technique to find subviews to interact with. Get to know
logElementTree() very well.
For completeness sake, lets log the element tree of the entire window.
window.logElementTree();
Yes, it keeps going. It’s best to isolate the parts of the window you want to
log, instead. Remember, you can use the helper methods on UIAElement to find
things like scroll views, text views and the like.
This post is already pretty long so I’ll stop here. You have enough tools at your disposal to explore. In the future posts for this series I’ll unwrap more advanced features of UI Automation and get in to the real reason I started this; organizing your test suite. If you’re too impatient to wait, you can get a sneak peak for where I’m going by reading about Jeff Morgan’s page object pattern he developed for the Ruby community. A very good abstraction layer for tests and very much needed here.
This is part of a larger study about UI Automation. For a good collection of the resources I’ve worked on, check out the features page.
Just remember, the nasty Document Model of the web browser doesn’t apply here.↩
My books...